
Equipment: cycling
THE RIDING EQUIPMENT
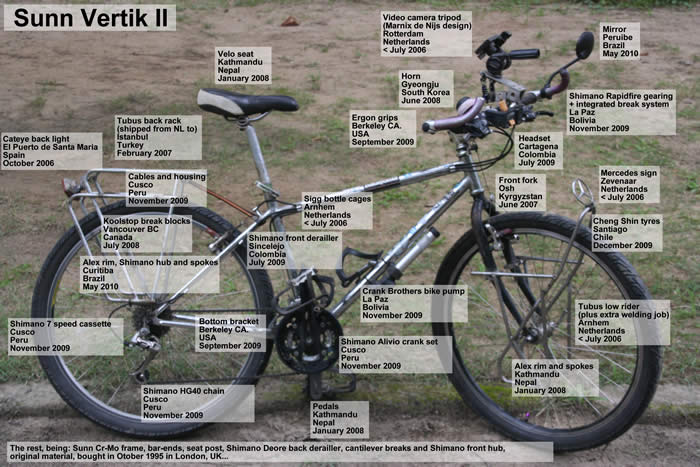
Both mountain bikes (chrome molybdenum steel frames) were bought in London in 1995/1996. Son is pushing a Sunn Vertik 2 and Ali a Ridgeback 604GX. The Sunn, a super slick and lightweight machine of just 11.4 kg, is equipped with Shimano Deore LX rapid fire gearing system and Shimano STX hardware. The Ridgeback has Deore LX thumb-shifts and Deore hardware. Neither are top of the range, but have worked perfectly for the last thirteen(!) years and are low maintenance. Furthermore, all the equipment is accessible world wide and therefore easy to repair (by us). No state-of-the-art disk breaks or equivalent luxury. Far too vulnerable in the middle of nowhere.

We are still pleased with our choice to take our old, trustworthy, bikes. The fact that we were used to them, they are steel and we can go with the motto: 'if it ain't broke, don't fix it' confirms our initial reasoning behind taking the Sunn and Ridgeback bikes along. If we could do it all again, we'd get the luggage eyelets welded solid before leaving. Between both our bikes we have had 5 snap off. So far all eyelets have been successfully re-welded. But at least they could be welded: everywhere in the world.
Latest: Son has replaced her Shimano Rapidfire shifters for another set in Bolivia. After 14 years, they had done their job...
+ steel is able to be welded in the middle of nowhere (as we have found out on many occasions; see 'connecting the racks to the bike' below)
+ simple/standard components can be replaced everywhere in the world and you can fix things yourself
- a little extra weight by being steel
Luggage Racks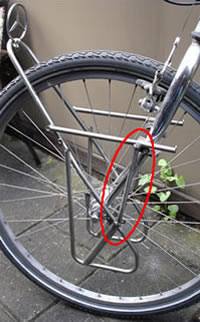
Son has installed a stainless steel Tubus low rider on the front and a Tubus Logo Expedition at the back. The lowrider needed to be adjusted to withstand several years of bags hanging on it and since her front fork didn't have any screw holes in it to keep the lowrider in place, we originally thought clamps would do the job. Unfortunately, they just didn't work. So we had its welded and put a piece in between; it's very sturdy and it looks great too. Better than the real thing!
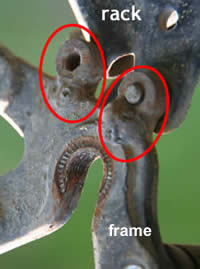
In Sary Tash, Kyrgyzstan, Sonya's Tubus back rack was welded to the main frame of the bike (unintentionally) after both attachment eyelets on either side of the bike frame broke off completely (see follow-up below).
Connecting the racks to the bike
If you plan to go on a long trip, checking your eyelets (the small rings on your frame where you connect the racks) should be the first thing you look at before you set off. Letting your local welder put some more solder on the connections won't hurt at all. We have had these connections welded and re-welded several times now, on both our bikes; in Portugal, Kyrgyzstan, South Korea, Belize, Peru and finally the Netherlands.
Ali has a Tubus Logo Expedition on the back and a Vittorio steel low rider on the front. He bought the Vittorio because it has fixed top piece where the battery and inverter can rest on. Additionally, here they are out of the sun underneath the handlebar bag. All that was further needed was for Ali to design a sort of platform for all the gear; Wiba Tools in Zevenaar manufactured it. After we abandoned the solar-panel experiment (see bike-touring-equipment-electronics), we replaced the mounts on the top piece with two bottle cages to hold our two 0.6 liter fuel bottles.
We set off with one Tubus and one aluminum rack each: a Topeak and a generic standard. The Tubus racks held out but the other two had to be replaced fairly quickly (in Barcelona and Istanbul). They just couldn't cope with the weight and the strain of lugging all our gear around everyday. We managed to replace them with two Tubus Logo Expeditions along the way and we're really impressed with the performance after more than 4 years through some pretty rough terrain. No breaks; hardly any rust; steel; so, if it happens to break...
+ incredible strength; low maintenance
- price at around 100€ each; low rider isn't stable on tapered front forks without screw holes
Tyres and Tubes
We started off with Schwalbe Marathon tyres and bought several replacements on the road. We are now cycling on brands that we can find locally. We carry a foldable Panaracer as a spare. Size of the tyres is (most of the time) 26x1.75. It has been necessary to buy 26x1.95 or even 26x2.10 because of the availability in some countries. It seems that 26 inch is the way to go, no problems finding tyres and tubes in this size virtually anywhere. We have tubes with Schrader (or car) valves for a couple of reasons. Firstly, because you can purchase these tubes nearly everywhere in the world. Secondly, you can pump them up with air everywhere too: at petrol stations, tyre establishments, bike and motorcycle repair shops. This valve is truly universal! And last but not least, once you have the car valve fitted, then the hole in your rim will accommodate all other tube types in an emergency. The other way around just doesn't work.
Overall scores of tyres used during the first 42 months: last updated February 2010
brand
Schwalbe
Marathon *1
Schwalbe
Marathon *2
Giant
Panaracer
*3
Kenda
Cheng
Shin *4
Ralson
local
brands (Thai, Malaysian,
Russian)
Bontrager Connection
*5
Maxxis Advantage *6
price in €
1000 km
4,14
2,77
1,00
4,09
4,18
0,88
2,32
2,60
32,09
4,05
flat tyres per
1000km (total)
0,22
(18)
0,96
(26)
1,14
(07)
1,18
(07)
0,67
(23)
0,51
(04)
1,06
(04)
17,39
(04)
(05)
used where?
Europe,
Middle East
China
to Japan (via KKH)
USA,
Mexico (Baja = cacti)
USA,
Central America
Central
/ South America
Subcontinent
Central
& South East Asia
Colombia
South
America
score *9
**
***
****
****
*
*****
**
**
NO
*
*1 We had some major problems with Schwalbe Marathon tyres in Central Asia. The beading snapped on three tyres within 1500 kilometres. We did get replacements free of charge from Schwalbe when we got to Japan, but unfortunately these didn't last that long either. Roughly 5000 kilometres per tyre, which we think is quite poor, considering the price.
*2 Even if we hadn't had the problem with the broken beading in Central Asia, the Schwalbe Marathons would still be a rather expensive choice considering their cost per 1000 kilometres...
*3 We now have used the Panaracer for more than 6000 kilometres. It still looks really good and has hardly worn at all. We keep it as a spare, since it is foldable. We think the Panaracer can go a long way! It cost US$ 35... so we still need to get some kilometres out of it.
*4 We put our first Cheng Shin's on in Santiago Ixcuintla, Mexico. Son has cycled 8325 and 10709 km on them respectively and they only cost us € 4 each ! Incredible ! We have since bought more of these CST Travellers and although they haven't lasted as long as the first pair (Ali used them as well), they are still incredibly cost-effective. Under a euro per 1000 km!
*5 Be really careful with these... I bought this tyre in Medellín. It looked pretty sturdy, although quite flexible, especially the walls. It ate four tubes in a few days, just devoured / broke off the valves, which led to two accidents, of which one was quite serious (going downhill at 35 km/hour, loosing all air pressure in your front tyre within 1 second, is no fun, I can tell you!)
*6 Pretty heavy tyres but walls are too flexible. We used this as a spare for a while, but got rid of it when we found some decent replacements. Not recommended.
*9 Our score is based on price, comfort, puncture resistance and durability/longevity.
So our conclusion is, that we are going to buy whatever we can get along the road, as long as it's cheap! You might get a few more punctures as it is rare to find Kevlar coating on the inside of your tyres, but it saves you lots of money.
+ The pair of Cheng Shin Tyres we bought for Son in Santiago Ixquintla, Mexico, have lasted 8325 and 10709 kilometers respectively. They cost us € 4 each and Son has had five flat tyre! The handling is great and they even perform quite good off-road. The ones we bought later didn't last as long, but were still great value for money.
Giant tyres were probably second best so far, considering where we were traveling (China, Pakistan via KKH, India, Nepal, Thailand, Malaysia, Japan) and the amount of traveling we did on them. And they were only US$ 10 each when we bought them in Kashgar.
- Kenda is total crap, US$ 20 for a tyre that doesn't
even get you 3000 kilometres on decent US roads...
Do not buy Bontrager Connection, dangerous.
If you're trying to find a Schwalbe or Continental tyre, or looking for a Giant or Merida dealer, here are four maps with the countries in which these brands have distributors. Click on the names on the right to switch between the brands. Click on the map to find out their contact details. (these are distributors, not bike shops! Ask the dealers where you can buy the tyres). For bike shops, check out the individual country information pages on this site.
Topeak Alien Tool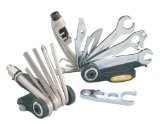
Bike maintenance is a fact of life on the road, so to keep everything maintained, we bought a Topeak Alien ll tool (the ultimate tool for road and mountain biking (according to Topeak and Ali)). Even though it has a total of 26 functions, Son is not convinced. She prefers good ol' spanners, allen keys, screwdrivers and of course the irreplaceable multigrip tool.
The Topeak Alien II is a very nice tool indeed. I would recommend this tool to anybody. It has everything on it for basic repairs should something happen to you on the road. And it is small and compact. The only disadvantage is the movability bulky grip at times: not being as small as a single tool, the repair jobs in a hard to get at spot are more difficult. But it is VERY strong. You'll brake your screws, before you break your tool.
+ strong, all the tools you need for simple on the road repairs (except for pliers); inexpensive
- needs more work space than a single tool; bulky grip at times
The Next Best Thing: Bike Wheel Cassette Removal Tool
On our bike maintenance course, we saw the need to purchase this little tool from M-gineering even though at the time we didn't quite understand how to use it. Secretly, we both hoped that situation would never arise.
But that was wishful thinking because our cassette removal tool has paid for itself over and over again. Anyway, we are not only very, very glad that we did the cycle maintenance course in the first place and that we decided to fork out the 25 euros for this little remarkable piece of bike tool engineering, but also our foresight to download the pdf instruction booklet onto our computer before we left. Our first attempt took quite a while, laptop, bike and grease in hand...
While it did seem a lot of money for a piece of alloy that fits in your palm, we know now the full value of 'the next best thing'. Every fool can now remove their back cassette to replace a broken spoke, should they want to, but honestly every touring cyclist should have one of these or a similar product in their bicycle tool kit.
+ can fix a broken spoke roadside; small; lightweight tool
- expensive initial outlay for infrequent use; need to have practice and instructions in beginning
Helmets
For safety reasons and because it's compulsory in a lot of countries bike helmets will be going along for the ride. When necessary Son adorns a Giro Skyline and Ali a Bell Delirium.
We are glad we brought our helmets. Although it is not compulsory in a lot of countries, we do wear the helmet most of the times. It just gives that extra sense of protection, especially on busy roads. And when it is cold, your head stays warmer; when it's hot, it stays cooler; when it rains, it stays dryer. And they do look really good on us too ;-)
+ sense of protection; shields from sun, wind and rain
- visors are flimsy and will end up coming off (attach to helmet with tie-wrap!)
Bicycle Computer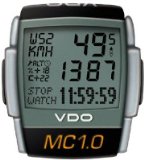
For keeping up with travel distances, heights conquered etc, Ali's Ridgeback has a VDO bicycle computer, type MC 1.0. It's a wireless cycle computer with integrated altimeter. In total 22 functions.
The MC1.0 is remarkably reliable. I bought it a few years before we actually left on our world trip, so I could get used to it. It has let me down only once, when the transmitter stopped working. This was due to the cold and the snow that we were in at that time. In general, it does seem to work less reliably in very cold weather, but that is likely to have something to do with the battery as well. But anyway, a replacement transmitter was sent within a week (no charge and a 5 year guarantee).
A lot of cyclists complain that a wireless cycle computer would register strange outputs when near electricity masts and train lines, but we have had that problem only once (standing underneath a dubious electricity pole in Mexico). I must admit that if you park your bike up to a window that is protected against burglary by means of electric wires, the computer will go berserk. So stay away from those! Another small minus point is the fact that the altimeter can't keep up when you are racing down... at the bottom of the hill you'll still have a few left to pedal, according to your computer...
+ reliable; long battery life; you know your stats at the end of the day
- not too good in the cold; can be interfered with when around electrical signals; can't keep up with you zooming downhills
Panniers and Handlebar Bags
Son will be carrying her Ortlieb Back-roller (40L.) and Front-roller Classics (25L.; all in grey) with QL-1 locking system, along with her fire-engine red Ortlieb handlebar bag. Ali has two sets of Ortlieb Front- and Backroller Classics. Same as Son's, but in black. The handlebar is still from Lone Peak (Alta H100, 10L.)
Ortlieb pannier bags are strong; have good handles for carrying upstairs; the locking system is durable; and above all, they are incredibly waterproof. The only, and very annoying, disadvantage of Ortlieb bags are the little black clips that go into the hooks, so they fit all rack sizes. (Son's bags are the older type Ortliebs; they don't have clips and therefore fit perfectly on the Tubus racks - lucky Son!) The clips fall out constantly and even gluing them in doesn't last forever. The only solution is to throw away the clips and put a band of tube and/or tape on the racks where the panniers go. This way, you won't need any more clips, nor have to carry any spares and your bags won't come off by accident or a bump either. See tip of the month June 2007.
+ very, very waterproof, sturdy; handy handles at the top for carting around
- annoying clips; screws end up rusting fast
Dry Bags / Dump Sacks
As of August 2010 we are using two Big River dry sacks, courtesy of Sea to Summit. The material is more flexible and the bags come in funkier colours too. Although we were a bit sceptical in the beginning whether the bags would stay waterproof, they have held up nicely and kept all the gear inside dry. They have handy loops on the sides, for easy attachment to your bike via bungie cords.
When we set off we used two Ortlieb Dry Bags (1x PD350, 22L. 1x PD350 35L.) to keep the sleeping bags and tent dry. They fit nice and snug on top of the back panniers. There is absolutely no worries with choosing any of the Ortlieb dry bags on offer. After a few years on the road, they needed to be replaced, due to quite a few holes in the fabric.
Bottle cages
Strange thing to mention, but bottles never last a very long time. So you should have bottle cages that fit all types of bottles. We didn't know the Sigg bottle holders were not big enough to hold any other bottle (marketing ploy no doubt), so when we needed to replace all but one bottles (one leaking due to wear and tear and two split open due to frost), we could not fit them in properly. Only because the bottle cages broke, do the other bottles fit, but that is not how it should be of course. So buy a standard size bottle cage and forget about those Sigg's.